07 Mar 2012
Bridge mode on ZyXEL P-663HN-51 DSL modems
My internet service is provided by the illustrious Sonic.net, and I just upgraded my Fusion Broadband from a single DSL line to two DSL lines. This increases my overall speeds to around 30mbits down and 5mbits up, which is great.
As part of the upgrade, I switched from a ZTE DSL modem to a ZyXEL P-663HN-51 modem. After a few hours of significantly faster internet speeds, I discovered a problem – my old router was configured to run in “bridge” mode, and the new router wasn’t. Without bridge mode, the Mac Mini I keep at home and use as a server was stuck behind a double-NAT. Since I need to be able to reach my Mini for IRC, among other things, this was a bit upsetting.
It got a lot more upsetting when I couldn’t figure out how to enable bridging on the new modem. The old modem let me enable bridging on the DMZ configuration page, but the new modem didn’t seem to have any settings related to bridging. After going through every single admin page and searching the internet for almost an hour, I gave up and called Sonic.net support.
The extremely helpful technical support rep that I talked to guided me through editing the routing configuration on the new DSL modem to enable bridging. Since I would have loved to just find a blog post explaining how to do it instead of having to call, here’s a blog post explaining how to do it.
It’s pretty simple, once you know what you’re doing. Browse to the P-663HN-51 admin website. If you haven’t changed any settings, that will mean opening http://192.168.1.1 and logging in with the username “admin” and the password “1234”. Once you’re there, click on “Advanced Setup” in the left-hand column, and then on “WAN”. It should look like this:

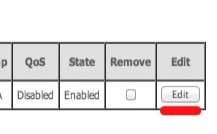
Then click the “Edit” button on the right-hand side of that page:
Be sure to turn off NAT, DHCP, and IP address assignment now, before you turn on bridge mode. Apparently, they aren’t turned off, but the UI to disable them disappears once bridging is enabled. (Thanks, Craig Paxton.)
You’ll want to click “Next” at least once, until you eventually end up at a page that lets you choose bridge mode. Click the radio button labelled “Bridging”, and then push “Next” some more:

Once you reach the last page, you’ll be able to save your change. After that, you should restart the router to disable the DHCP server.
Now you’re set. Yay.
8 months later:
It’s not entirely obvious, but one big thing changes once bridge mode is on. You can’t connect to the router’s web admin interface. It turns out that the DHCP address that you get assigned, when the modem is in bridge mode, only knows how to talk to the outside internet. Here’s how to connect to the modem again, in case you ever need to: manually configure your ethernet interface to have a static IP address in the 192.168.1.x range, with the final value being higher than 1. Set the router to 192.168.1.1. Open a web browser, and navigate to http://192.168.1.1. There you go.